Pilot Setup Guide: SuperOffice Database Replication
Version: 1.0 (Pilot Phase)
Status: Beta / Parallel Run
This document outlines the technical requirements and steps to set up the new SuperOffice Replication Pilot. Unlike the legacy "Mirroring" solution, this client uses Change Data Capture (CDC) to stream data changes from the SuperOffice Cloud (Source) to your local SQL Server (Target) in near real-time.
Pilot Strategy for customers using "Database Mirror":
During the pilot phase, you must run this replication client in parallel with your existing mirroring solution. Do not disable legacy mirroring until data integrity has been validated.
Change Data Capture: Enabling CDC increases the database size (approx. +20%) and transaction log usage
Summary of tasks:
1. Target DB: Create a new, empty local SQL database. Create a user with db_owner privileges, add schema2. Download: Get Replication Client zip
3. Edit: Open appsettings.json. Update ConnectionStrings to point to your local target
4. Execution (Run as Admin) Run the following commands in order via CMD/PowerShell:
a) Link Tenant b) Initial Load c) Register Service d) Start Service
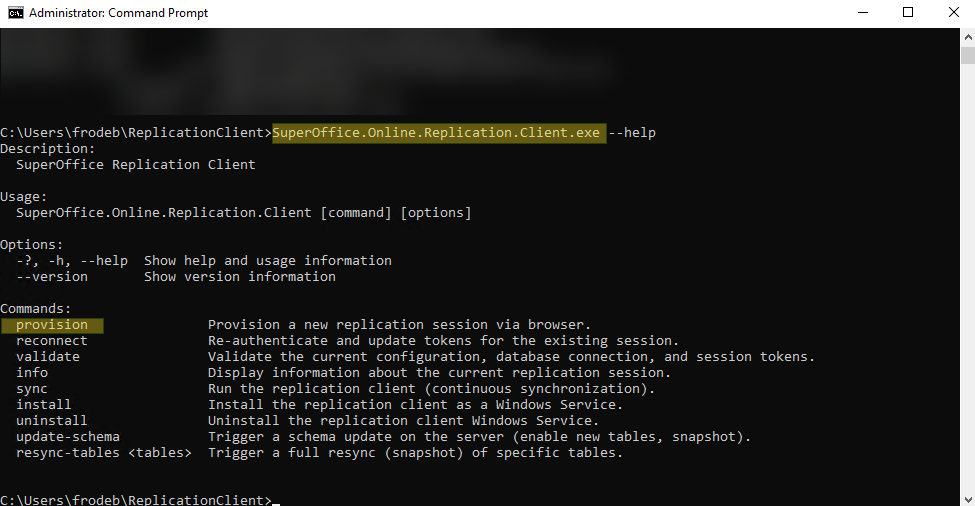
SuperOffice.Online.Replication.Client.exe provision
SuperOffice.Online.Replication.Client.exe sync
SuperOffice.Online.Replication.Client.exe install

sc start "SuperOffice Replication Client"
Prerequisites
- .NET 8.0 Runtime: Ensure the target machine has the .NET 8.0 runtime installed (unless using a self-contained build).
- Target Database: A local or accessible MS SQL Server instance.
- An empty database is recommended for the initial setup.
- The user provided in the connection string must have
db_ownerpermissions to create tables and manage the_ReplicationStatetable.
- Network Access: Outgoing internet access (HTTPS on port 443) to the SuperOffice Online services and SSO providers:
- SuperOffice Replication Dispatcher (for provisioning/tokens).
- SuperOffice Replication Service (for the data stream).
- Administrative Rights: Required for interactive provisioning and service installation.
- Operating System: It is currently distributed as a standalone Windows executable and includes commands to install itself as a background Windows Service.
Phase 1: Approvals & Access
- Request Backend Enablement: Submit the Pilot Entry Form to request backend preparation.
- Note: SuperOffice Operations must manually enable Primary Keys on the source database before you proceed.
- Open and submit this form
- Network Configuration: Whitelist the following hostnames for outbound traffic (HTTPS/443):
id.superoffice.com(Authentication)- SSO providers if used
online.superoffice.com(Replication Stream)
- Create Target Database: Create a new, empty SQL database on your local server (or Azure SQL).
- Example Name:
SuperOffice_Replication
- Example Name:
- Create SQL User: Create a dedicated SQL user for the client.
- Permission Requirement: The user must have
db_ownerprivileges (or minimally: Read/Write + Create Table rights).
- Permission Requirement: The user must have
- Create SQL Schema: The Replication Client is configured to store tables using a specific prefix default: crm7.
- The provision step will try to create this Schema for you using the db_owner privileges.
-
If your user need - run the following SQL query on your target database to create it manually:
-- 1. Create the schema CRM7
CREATE SCHEMA [crm7] AUTHORIZATION [dbo];-- 2. Ensure your replication user has access to it
-- Replace 'YOUR_USER' with the user created in the previous step
ALTER AUTHORIZATION ON SCHEMA::[crm7] TO [YOUR_USER];
read more about the schema here.
- Download Client:
- Log in to OC (with your CRM Online Admin user) https://online.superoffice.com/OC2/
- If multi-tenant: Select correct tenant from drop-down top left.
- Go to tile "Replication"
- Download the Replication Client from top right (Download the old zip file)
- Log in to OC (with your CRM Online Admin user) https://online.superoffice.com/OC2/
- Extract Files: Unzip the downloaded zip to a dedicated folder (e.g.,
C:\Replication\). - Configure Connection: Open
appsettings.jsonand update theConnectionStringssection. Example on how a connection string look like:
"ConnectionStrings": "Server=YOUR_SERVER;Database=YOUR_DB;User Id=YOUR_USER;Password=YOUR_PASSWORD;TrustServerCertificate=True;",\\).Fix: Change
"Server=localhost\web;..." to "Server=localhost\\web;..."Prerequisite: Ensure you have received confirmation from the Pilot Team that Backend Enablement is complete.
Performance Impact During Initial Provisioning.
When running the provision command for the very first time, the client triggers the activation of Change Data Capture (CDC) on all tables in your SuperOffice Online Cloud database.
Expected Behavior: This is a heavy, one-time backend operation that temporarily locks tables to update indexes. Active SuperOffice users may experience short-term performance degradation or timeouts (typically lasting 5-10 minutes). It is recommended to run this initial step outside of peak business hours.
Subsequent Runs: Once CDC is enabled, running the provision command again will only verify the existing configuration and will not impact database performance.
- Open Command Prompt (CMD) or PowerShell as Administrator.
- Navigate to the installation folder.
- Run the provisioning command:
SuperOffice.Online.Replication.Client.exe provision
- Authenticate: A browser window will open. Log in with your SuperOffice Administrator credentials - for your CRM Online tenant.
- (If multi-tenant) Select Tenant: Choose the customer tenant you wish to replicate.
You should now see "Provision Replication Session" dialog in your browser.
- IF NOT (ie. you where redirected wrongly to the SuperOffice client etc.) - copy the URL from command promt - and paste it into your browsers address,and press Enter to see the "Provision Replication Session" dialog. - Create Session: Enter a unique name for this replication session (e.g., Pilot_Prod_Node_01), and click [Create session] button to start the provisioning.
- [ ] Run Initial Sync: To download the database schema and initial data load, run
SuperOffice.Online.Replication.Client.exe sync

Duration depends on database size. This step creates the tables in your local SQL DB.
- [ ] Install as Service: Register the client as a Windows Service for continuous background operation.
- [ ] Start Service: Start the Windows Service for continuous background operation.
SuperOffice.Online.Replication.Client.exe install
sc start "SuperOffice Replication Client"
- [ ] Verify Service is started.
- [ ] "Database Mirror"-customers - Data Validation: Periodically compare row counts between your legacy Mirroring database and the new Replication database to ensure integrity.
- [ ] Monitor Disk Space: Ensure your local server has sufficient storage for the growing database.
Important: The 7-Day Data Retention Rule
Unlike the legacy mirroring solution, SuperOffice Replication streams data changes through a cloud-based message queue (Kafka). To ensure optimal performance, this queue has a strict 7-day retention limit.
What you need to know: Your local Replication Client must successfully connect to the SuperOffice cloud to pull data at least once every 7 days.
What happens if you are offline for >7 days? If your local server is shut down, offline, or experiences network issues for more than 7 continuous days, your unpulled data will expire and be deleted from the cloud buffer. The replication stream will break, and your client will not be able to resume. You will typically see a "500 Internal Server Error" in your Event Viewer (specifically failing on SchemaRequestBuilder.PutAsync) when the client attempts to reconnect to an expired position in the stream.
How to fix an expired session: The client cannot automatically "catch up" after the 7-day window has passed. You must initiate a full reset:
- Contact SuperOffice: Notify your Pilot Coordinator pilot@superooffice.com and request that we trigger the "Resend All Data" routine for your specific tenant. This resets the offsets in the cloud.
- Local Reset: Once SuperOffice confirms the backend has been reset, we recommend that you empty/truncate your local database.
- Restart Sync: Run the provision and sync commands again to perform a fresh initial data load.
All Replies (2)
Manual Upgrade Procedure
To upgrade the client:
- Stop the Service:
sc stop "SuperOfficeReplicationClient_ - Backup Configuration: Copy your appsettings.json and nlog.config to a safe location.
- Download new version: see 'Phase 3: Client Installation' above.
- Replace Binaries: Overwrite the contents of the installation folder with the new version files.
- Restore Configuration: Restore your
appsettings.jsonand nlog.config (if overwritten). - Start the Service: sc start "SuperOfficeReplicationClient_
- Verify: Check the logs or run Replication.Client.exe validate to ensure connectivity.
A new version of the Replication Client is published!
Version: 1.0 (Pilot Phase) - Release: 03.03.2026
- see 'Manual Upgrade Procedure' above.